Solar S'mores
Create your very own solar oven to cook up some S'mores this summer! If it is a warm, sunny day, it will take about 30-45 minutes to cook in the solar oven. Adult supervision is required for this activity.
Fun Facts/Information:
- Renewable resources are natural resources that can easily be replaced in a short period of time.
- Nonrenewable resources are natural resources that cannot be easily replaced due to needing millions of years to form.
- Our solar oven uses solar energy which is a renewable resource.
- Charcoal and gas are both examples of nonrenewable resources.
Learning Objectives:
- Students will use solar energy as a sustainable resource for cooking.
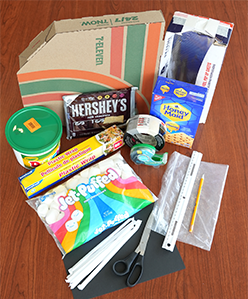
Materials:
- Unused Pizza Box
- Ruler
- Scissors
- Pencil
- Utility Knife (Adult use only)
- Heavy Duty Aluminum Foil
- 2 Gallon Plastic Bags
- Plastic Wrap
- Scotch Tape
- Masking Tape
- Black Construction Paper
- Straight Straws or wooden skewers
- Clay (optional)
- Graham Crackers
- Large Marshmallows
- Hershey Bar
Procedure:
Safety Considerations:
- An adult must supervise this activity. Only an adult should be using the utility knife to cut the box.
- Make sure to fully seal your solar oven with plastic wrap to keep away any critters or dirt
- Use a ruler and pencil to measure and draw a border of
1.5 inches around the entire perimeter of the pizza box
lid (It will look as if it is a frame).

- An adult will then need to use a utility knife to poke a slit through 3 of the 4 lines that were drawn. This slit needs to be large enough for a pair of scissors to fit into it. Only cut those 3 lines of the square frame, leaving 1 line/side attached to act as a hinge. (The red lines are the sides of the square that need to be cut).
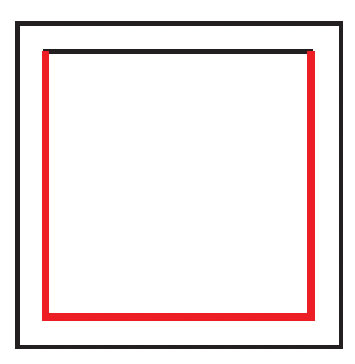
- Use scissors to cut along the three lines mentioned above, then fold the cardboard flap back along the attached side.
- Use aluminum foil to line the inside of the box so that the entire interior is coated with it. Use tape to secure the foil.
- Also line the inside of the cardboard flap with aluminum foil. Fold edges over the cardboard and secure with tape.
- Cover the bottom of the box with black paper and secure with tape. This will be the solar oven’s heat sink that absorbs most of the sunlight.
- Cut the 2-gallon plastic bag along the seams so that you have two sheets of plastic. Cover the window opening made by the flap with the plastic sheets. Use tape to secure. This can be reinforced with plastic wrap to ensure there are no holes and the edges are sealed.
- Use straws or wooden skewers to prop the solar oven’s lid up to about a 90 degree angle from the rest of the box. Clay can be used to connect straws for necessary height or to help with stability. Be sure to check that the sunlight is reflecting off the foil and into the box.
- Break graham cracker in half and choose desired amount of the chocolate bar.
- Cut two pieces of aluminum foil slightly larger than half of a graham cracker. Fold edges and place the one half of a graham cracker on each aluminum tray. Then place a marshmallow on one of the graham crackers, and your piece of chocolate on the other. Place trays with smores ingredients into the solar oven, on top of the black paper.
- Place your solar oven outside under full, direct sunlight for at least 30-45 minutes. If the solar oven is kept in the sun longer, turn the box so that the flap faces the sun.
- When the marshmallows are soft, the s’mores are ready to enjoy. Combine both halves of the graham cracker to form a sandwich with the marshmallow and chocolate in the middle.
Discussion Questions:
- What changes could be made to your oven to improve its effectiveness in cooking your s’mores?
- Question 2: The solar oven can heat up to 160 degrees Fahrenheit. How does this compare to a kitchen oven?
Extensions
- Once you are done using your solar oven for S’mores, try making rainbow crayons! Place a cookie cutter or small plastic container onto a paper plate. Place broken crayons into the cookie cutter or small plastic container and see your crayon form
Quick Links
Where are Activities Available?
We partner with over 600 educational organizations.
See our school locator